Essential Tips and Tricks for a Successful EDDM Campaign


If you ve read through our Definitive Guide to Every Door Direct Mail, then you know that EDDM has a lot of moving pieces but can be incredibly accessible and easy to use, regardless of your marketing or design experience. Read on for additional tips and tricks to help you on the road to EDDM success!
We cover a lot of important info in this article, however, if you're looking for a complete (but simple) EDDM solution, check out our direct mail service. It includes everything you'll need to design, print & mail your EDDM postcards (even an integrated EDDM mapping tool).
BEFORE YOU BEGIN...
1. Do Your Homework!

Prior planning really does prevent poor performance!
Image by StockSnap from Pixabay
While Every Door Direct Mail does not require you to acquire or maintain your own mailing list, the success of your campaign is heavily dependent on your own ability to assess who your customer actually is. This means that you need to establish for yourself the demographics of your ideal customer (age, income, household size, etc.) so that you can accurately filter the available postal routes in the USPS Mapping Tool to reflect those qualities.
...the success of your campaign is heavily dependent on your own ability to assess who your customer actually is.
If your mailpiece is promoting products for senior citizens, you ll get better results by targeting a retirement community than you will a neighborhood of young families. In the same way, advertisements for your pizza delivery service will likely see a greater response if sent to areas on and around a college campus than they would if delivered to the homes of those over 65.
More Route Selection Tips...
- Register for your USPS account and/or login BEFORE beginning the route selection process. If you forget to do so, you will be prompted to login to complete your order and may have to make all your selections again.
- To locate the routes nearest your business, enter your address in the mapping tool. You ll be able to easily identify prospective routes on sight, putting your neighborhood know-how to work!
- Pay online for your mailing if possible. Taking care of this ahead of time saves you a step on drop-off day and gives you peace of mind just knowing that it s done.
DESIGNING YOUR MAILPIECE
2. Will They Take It? (Size & Layout Requirements)
Don't be left at the gate - know your dimensions!
Image via Barkley Regional Airport
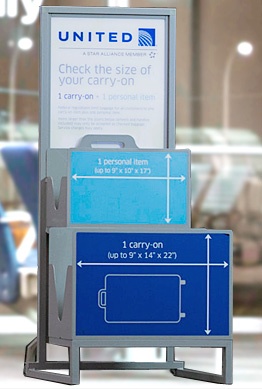
In the same way that airlines are particular about the size of carry-on luggage, the Postal Service is very specific about the minimum and maximum dimensions for an EDDM mailpiece. To ensure you re not left at the Post Office gate holding a box full of now-worthless postcards, it s absolutely essential that you verify your design fits within the parameters they ve set. For help, check out the below graphic.
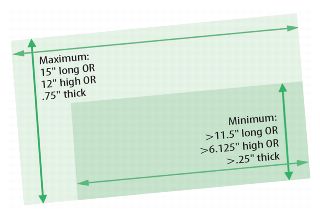
When it comes to EDDM, knowledge is power!
Image via USPS
3. Required Inclusions - Address Block & Indicia
The Postal Service has also set out for its EDDM customers the requirements for placement of both the address block and postage indicia for each mailpiece. Ignore their request at your EDDM campaign s peril! The below graphic provides a helpful visual. In short, the postage indicia needs to be in the top right corner (with a smidgen (>1/8") of space on the outside edges) and the address block needs to be below and to the left of the indicia. Both pieces should appear in the top half of the mailer (the short way). (More details can be found in our Definitive Guide to Every Door Direct Mail)
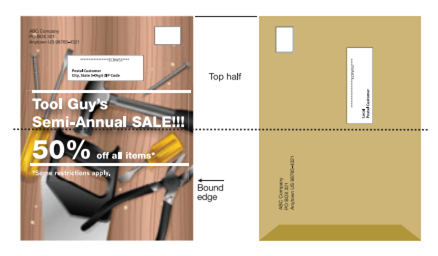
Smart placement of the postage indicia and address block is an essential component of a successful EDDM campaign!
Image via USPS
4. Templates to the Rescue!
The best way to ensure your design won t get you kicked out of the Post Office is to begin with a pre-designed template that already meets USPS requirements. MyCreativeShop offers a bundle of customizable EDDM postcard templates that make the entire design process stress-free. Your finished project can be printed with us or you can take it to the printer of your choice, leaving you fully in control!

Design via MyCreativeShop
Other Design Tips...
- Consider aligning your mailing with a planned sale or promotion so that you can include a coupon or special offer and track the response rate.
- Repeat essential contact information or your chosen response mechanism at least twice in your design (front and back). The contact details you include should be the BEST way to get a hold of you so that you don t leave prospective customers hanging.
BUNDLES AND MAIL TUBS AND PAPERWORK, OH MY!

Pay no attention to the man behind the curtain, you've got everything you need!
Wizard of Oz GIF via Vanity Fair
5. Bundle Smarter, Not Harder
One of the signature pieces of the EDDM process is that all mailpieces must be bundled before being dropped off at the Post Office. Not only does this make life easier for the mail carriers, who are your heroes in this scenario, it makes it easier for you to know that you ve got the right number of postcards for each route you ve selected.
Postcards should be bundled in stacks of 50 or 100, and most printers who handle EDDM will offer bundling as a finishing option (MyCreativeShop does!). If it fits in your budget, this is definitely the way to go. If not, it s totally possible to do it yourself, especially if you utilize one of these tips for bundling success:
- Option 1: Measure Your Stacks
Both of these options require that you first hand-count a stack of 50 or 100. If you choose to measure your stacks, you will then place each successive stack next to the first to ensure they are the same height and, therefore, the same quantity. You may be off one here or there, but they won t leave you at the gate for that!
- Option 2: Weigh Your Stacks
Again, this option requires that you start with a hand-counted stack of 50 or 100. Your next step is to weigh that known stack and then do the same for each stack to follow, ensuring that they are all the same weight (and, again, the same quantity!).

Weighing your stacks is just one way you can ensure that all your bundles are the same size. Leave the pigeons at home, though!
Image by SichiRi from Pixabay
Once you have your stacks, you ll need to secure them with a rubber band, paper sleeve, or other elastic loop. Whichever method you select, make sure it doesn t damage your mailpiece before committing!
Preformatted: Note: Depending on the size of your mailing, choosing to use bundles of 100 instead of 50 can save you a lot of time (not to mention you ll only need to use half the number of facing slips!).
6. Mail Tubs Are a [Mail]Man s Best Friend
Once you ve selected all your routes and know the total number of routes and mailpieces you ll be dealing with, swing by your local post office and ask them for some mail tubs, one for each route. You ll make your life and theirs a whole lot easier with this simple pre-planning step. All the prepared bundles for each route (with facing slips) will then be placed in one of the mail tubs and returned to the Post Office, completing both your mailing and the circle of life!

That feeling when you FINALLY drop off a completed EDDM mailing!
Lion King GIF via Tenor
7. Paperwork Made Simple (Facing Slip Tips and Tricks)
Prepping your EDDM postcards for mailing includes making sure you ve got all the required paperwork in order. In addition to the Retail Post Office Listing Form, which summarizes the Post Office locations related to your order, you ll also print off a Mailing Statement and one Facing Slip per route. Take advantage of the Mailing Statement as you organize your mailpieces by route, then turn your attention to the facing slips. Since the USPS tool only generates one facing slip per route, you ll need to do a little work to complete your mailing (unless you ve only got one bundle per route!). Check out these tips to make your life a little easier:
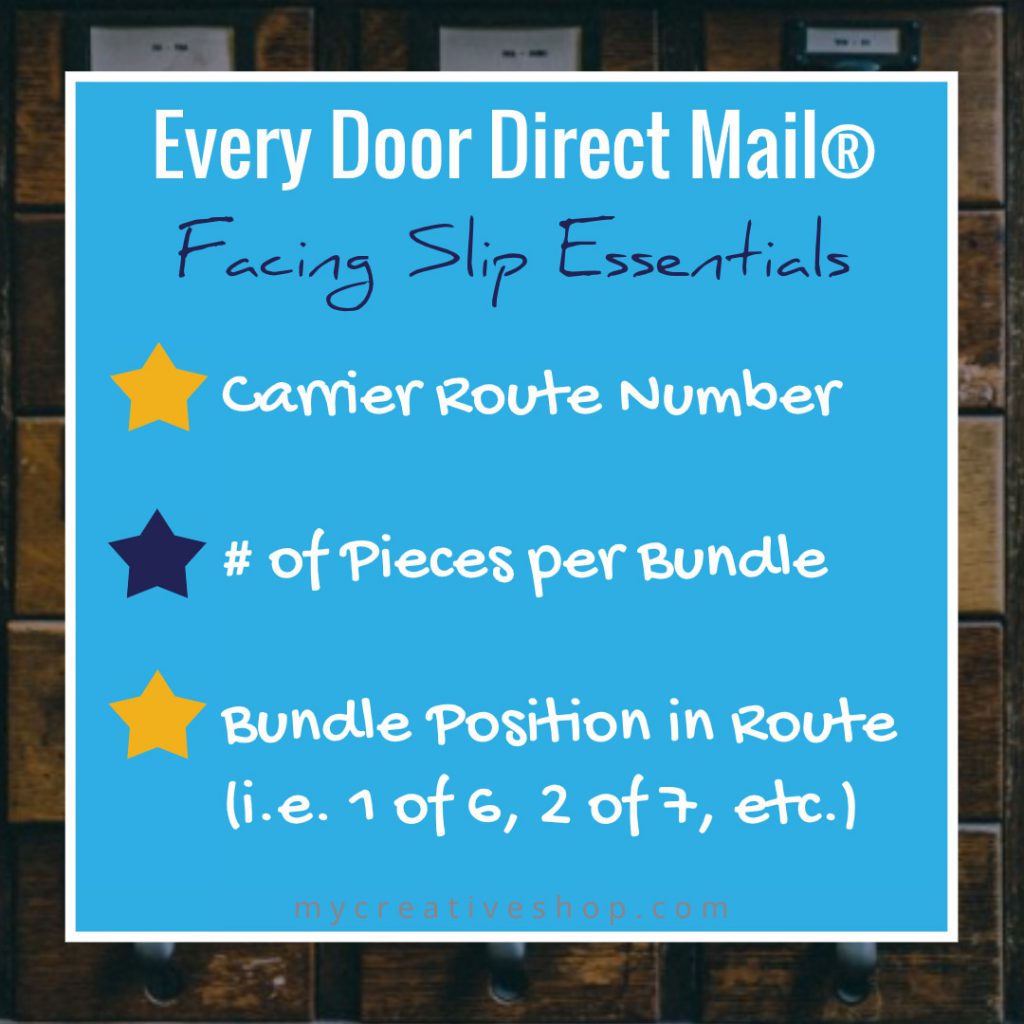
Make sure your facing slips include these 3 essential details.
Image via MyCreativeShop
- Use your printer or copier to make a copy of each route s facing slip, one per bundle.
- If you don t have a printer/copier or don t want to spend that much on ink, you can cut a regular sheet of paper into halves or quarters and then handwrite the essential information for each bundle (Carrier route, number of pieces in the bundle, and the bundle s position within the entire route - i.e. 1 of 6, 2 of 6, etc.).
- Speed up the process of inserting the facing slip within the band on each bundle by folding the entire stack of slips in half and then sliding them on top of the appropriate bundle.
************************************************************************************
Final Thoughts...
A successful do-it-yourself campaign is always within reach, and a few insider tips can help you along the way. MyCreativeShop can help in a variety of ways, including our customizable EDDM postcard templates and our on-point EDDM printing service. In addition, your custom design can be easily duplicated and tweaked for future projects, saving you time and money in the long-run! So what are you waiting for? Get started today!