The Definitive Guide to Do-It-Yourself Every Door Direct Mail


So you want to reach a new-to-you audience with a message that will resonate with them? Every Door Direct Mail is where you need to be! Want to know what it is and how to make it happen? Read on!
What is Every Door Direct Mail?
Every Door Direct Mail (EDDM) is a program offered by the US Postal Service that allows customers to send out identical advertisements to a specific group of recipients. An online mapping tool is used to sort postal routes by the recipients demographic data, such as household income, age, and household size. With the ability to mail anywhere from 200-5000 mailpieces per ZIP code per day, EDDM is an ideal tool for marketing your business locally.
What Can Every Door Direct Mail Do for You?
There are all kinds of reasons for you to give EDDM a try, but we ve narrowed it down to our top three: no mailing lists to buy, lower postage costs, and the ability to connect with new likely customers.
- No Mailing Lists to Buy
Most print marketing sent through the mail requires you to maintain a mailing list either by building it yourself or buying it off of someone else. With EDDM, there s no mailing list needed - all recipients are chosen by you based on their location and relevant demographic information. - Lower Postage Costs
If you re sending out non-EDDM postcard advertisements, you re likely paying the First-Class postage rate (which, as of October 2021 is $.40/postcard). One of the key benefits of EDDM is that the cost of sending each postcard is half the cost (or less) of sending via First-Class mail. Also, all EDDM postcards ship at the same low rate, regardless of size, so you can get even more bang for your buck! - New Connections
When sending out print advertisements via regular mail, you re often communicating only with those households that are already familiar with your company. Utilizing EDDM s online mapping tool allows you to select recipients that may have never had any interaction with your business, paving the way for the beginning of a beautiful friendship.
Casablanca (Warner Bros., 1942)
How Do You Create Your Own EDDM Mailing?
While all the moving pieces of Every Door Direct Mail may seem too complicated for a novice print marketer to handle, we ve distilled the entire process into 7 simple steps:
1. Design your mailpiece
In order for your mailpiece to be accepted as an EDDM mailing, it has to meet specific size and weight requirements and include a properly formatted address block and postage indicia.
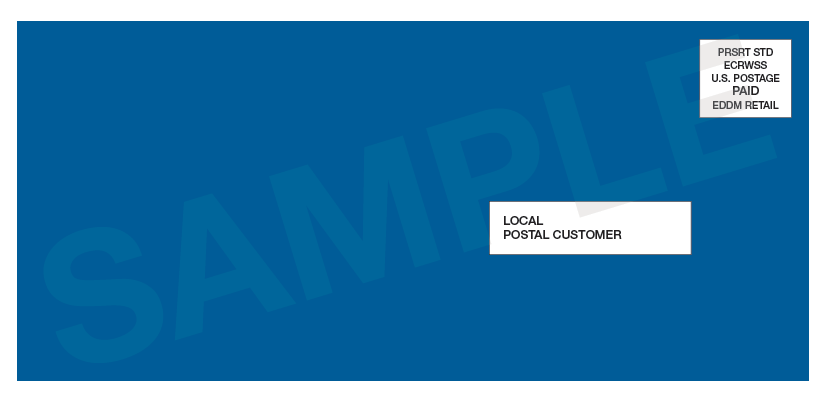
via USPS
- Size and weight:
EDDM mailings must be a minimum of 0.007 thick (approximately 3 sheets of standard printer paper) up to a max thickness of 0.75 and weigh less than 3.3 ounces. EDDM mailpieces must be at least 10.5" long OR 6.125" high OR .25" thick and no more than 15" long, 12" high, and .75" thick. Common EDDM postcard sizes include 6.5 x9 , 6.5 x11 , 6.5 x12 , 8.5 x11 , 9 x12 , and 12 x15 . The most cost-effective postcard size is 6.5 x11 , as it gives you a lot of marketing real estate without blowing your print budget and sticks out from the other mailpieces in the recipient s mailbox. MyCreativeShop offers EDDM postcard templates in 6 x9 and 6.5 x11 .
- Address block:
Every EDDM mailpiece should be addressed to POSTAL CUSTOMER or LOCAL POSTAL CUSTOMER on a solid white rectangular background.

via USPS
- Postage Indicia:
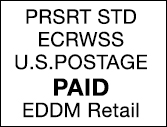
EDDM mailpieces must include the EDDM Retail Indicia, which:- Must be placed above and to the right of the address block.
- Must be larger than 0.5" x 0.5".
- Must be in all caps and at least a 4 point font size.
- Must fit in the area 1.625" from the right edge and 1.375" from top edge and leave 1/8" of space around the top and right edge.
via USPS
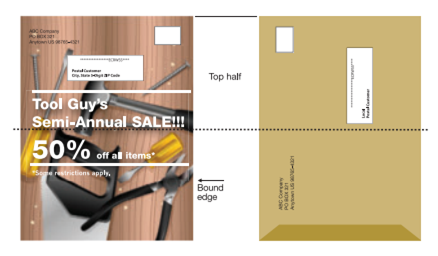
Note: Your EDDM mailpiece must also have the entire mailing label (address block and postage indicia) on the "top half" of the mailpiece.The "top half" will always be the shortest end of the mailpiece, and the address block and postage indicia must not be upside down (See below).
via USPS
Overwhelmed? No worries - MyCreativeShop s EDDM Postcard templates already meet the size and weight requirements and include appropriately-placed address blocks and postage indicia!

Pet Clinic EDDM Postcard Design by MyCreativeShop
2. Order (and Bundle) Prints
Once you re satisfied with your finished design, it's time to order prints. EDDM Retail allows for up to 5000 delivery points per ZIP code per day, so calculate the number of prints you'll need accordingly. Choose a heavier weight paper and high gloss UV protection on one or both sides.
Another consideration when ordering prints is that the Postal Service requires that EDDM mailpieces be bundled in groups of 50 or 100. Many print shops that offer EDDM postcard printing (like MyCreativeShop!) also offer bundling as a finishing option. Taking advantage of that service helps to streamline the entire mailing process. You can also skip this option and do it yourself after receiving your prints.
Note: Each bundle will require its own facing slip, so bundles of 100 will automatically need slightly less attention.
3. Choose your routes
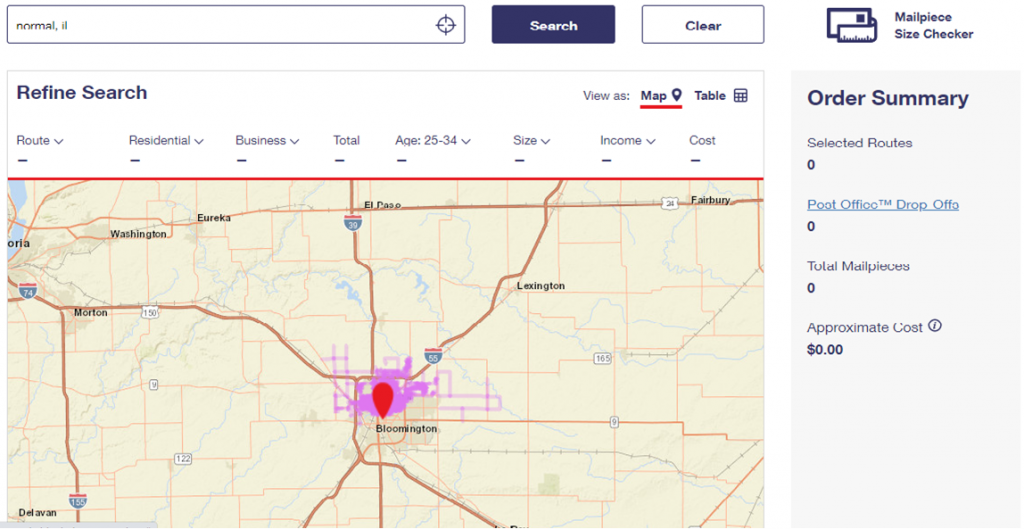
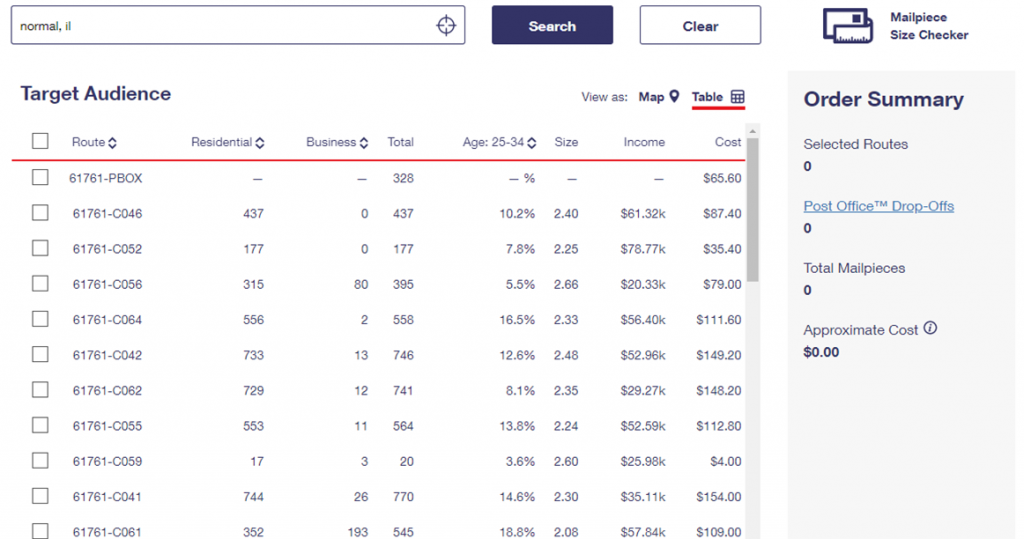
Once you have your postcards designed and prints ordered, you ll need to head over to the Every Door Direct Mail website. There, you can begin to narrow down the postal routes in your area either by your desired city and state, ZIP code, or proximity to a specific address. Before you begin, make sure to log in to your USPS.com account (don't have one? register here - it's free!).
Note: If you forget to log in before choosing all your route, you'll be prompted to log in after clicking "Next Step." Unfortunately, the map and all your chosen routes will then reset. So LOG IN FIRST!
via USPS
The mapping tool is designed to allow you to view and select your results either on a map or in a cumulative table format. The map view is helpful for those looking for a visual of the reach you can expect. The table view, however, shows you the details of each route so you can make an apples to apples comparison.
Use the drop-down column headers to sort or filter the routes you re viewing by a slew of demographics, such as age range, household size, and household income. You can also limit your results to only residential addresses or include business recipients as well. As you make your selections, you ll notice that each route listing includes the total delivery points (number of mailpieces) and postage cost, so that you can stay within both your print count and budget.
The routes you select should reflect the characteristics of the ideal audience for your mailing AND fit within your budget. In table view, use the checkboxes to select and deselect routes as you move through the options. For map view, click each route to choose your recipients. The Order Summary along the right side of the screen will update with your total routes, drop-offs, mailpieces, and cost so that you can get the best bang for your buck.
4. Choose your drop-off date and payment options
Via USPS
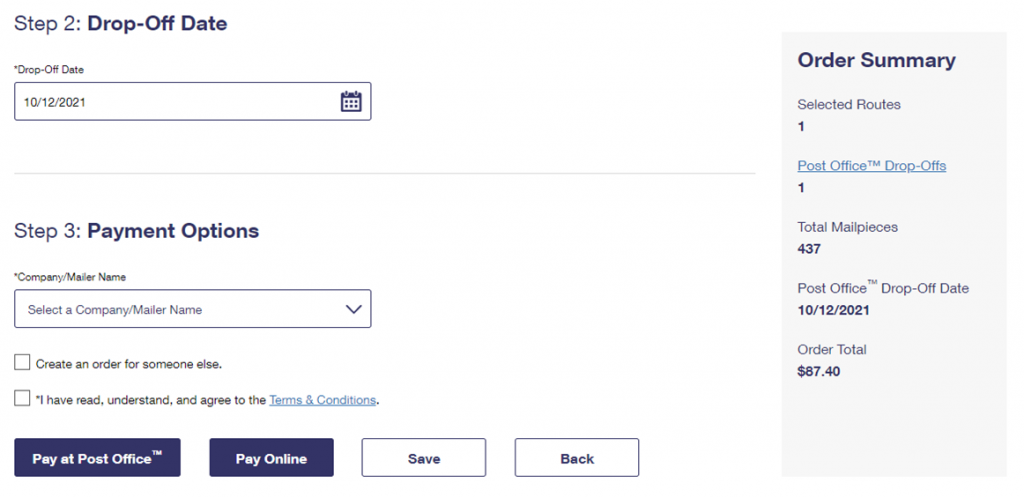
After selecting your routes and clicking "Next Step," you'll be prompted to select your Drop-Off Date (Step 2) and Payment Options (Step 3). Choose the date you'd like to take your mailpieces to the Post Office, then select your payment option from the following:
- Pay at Post Office
If you choose to pay at the Post Office, you will complete your payment in-person when dropping off your mailpieces. You can then utilize any of the payment methods accepted by your local Post Office.
- Pay Online
You can save yourself some time at drop-off by paying for your postage online with a credit or debit card.
5. Print your paperwork
via USPS
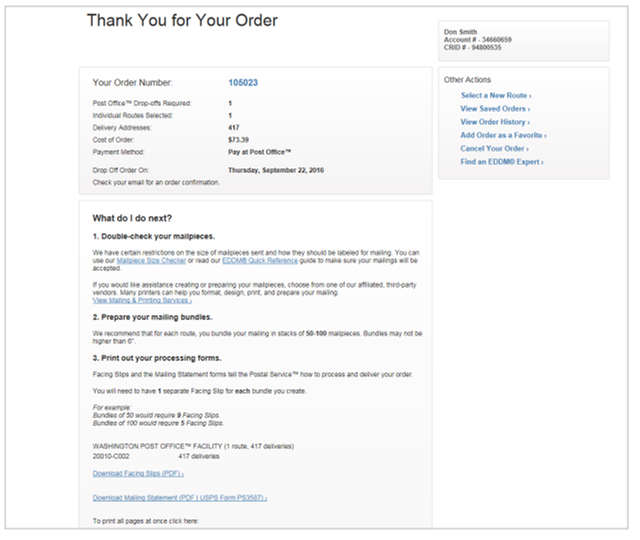
After selecting your payment option and completing your order, you ll be prompted to print out all the appropriate forms that must accompany your mailing. They include:
Note: When printing from the USPS EDDM Online Mapping tool, these forms will auto-populate with your order information.
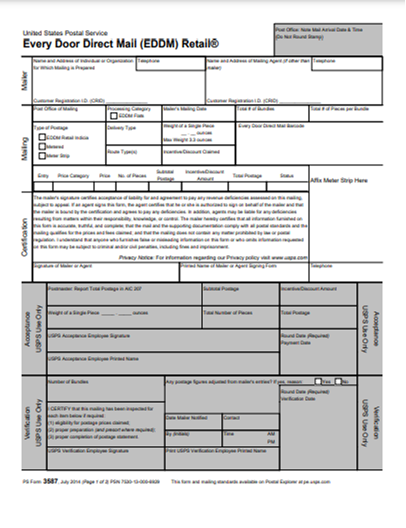
- Retail Post Office Listing Form (USPS Form PS 3587 - Page 1)
This page summarizes the Post Office locations related to your order, along with their contact information and hours of operation. As the mailer, you will also sign this form and hand it over to the Postal Service employee at drop-off. - Mailing Statement (USPS Form PS 3587 - Page 2)
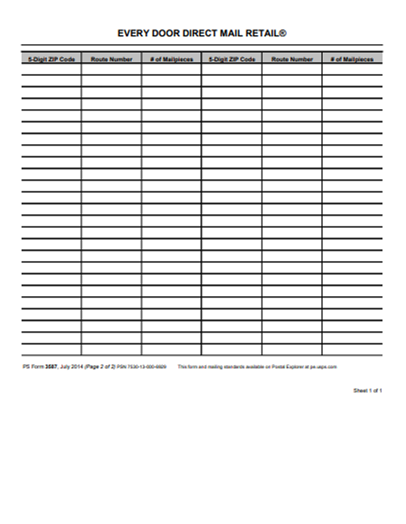
This form is a table that lists each route by ZIP Code, carrier route number, and total number of mailpieces per route. You ll rely on this page when organizing your bundles. - Facing Slips
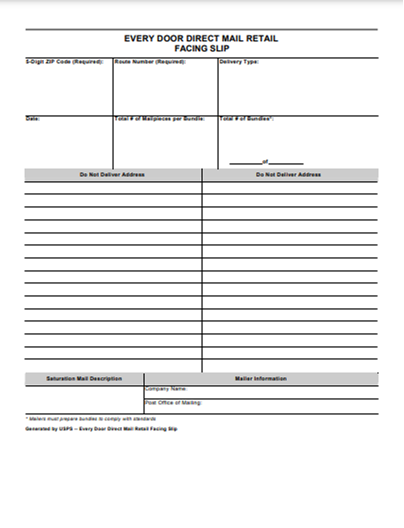
Facing slips are used to indicate the carrier route, quantity, and number of bundles per route. One facing slip is generated for each route, so make copies as needed, since each bundle in a route requires a facing slip.
Tip: If you re low on ink or simply want to save paper, you can tear a piece of white paper in half and write the essential details to create a DIY facing slip.
6. Assemble your mailing
Once you have your mailpieces and paperwork in hand, it s time to wrap up the whole process! We ll take you through it step by step:
- Bundling
If you did not choose to have your prints bundled for you, you ll need to do that now. Bundles of 100 are easiest to work with, but 50s can also be used.
Pro Bundling Tip: To save time when bundling yourself, count out a stack of 100 (or 50), then compare its height with that of subsequent stacks to create your bundles. You can also weigh your counted stack and then use the total weight as a guide.
- Grouping
Now that you ve got your bundles, you ll need to separate them into piles or bins by route. You ll want to have the Mailing Statement you printed handy since it already lists the number of mailpieces in each route. Each route will consist of a group of whole bundles (100s or 50s) and then a partial bundle. For example, a route with 647 delivery points will require 6 bundles of 100 (or 12 of 50) and a bundle of 47.
A facing slip must be attached to each bundle that includes:
- Route Number
- Number of Mailpieces in Bundle (in our example, either 100 (50) or 47)
- Bundle Position (in our example, X of 7)
Once you ve completed the grouping process, you ll want to place each route s mailers in a separate bin.
Pro Tip: Prepare for this step ahead of time by stopping at your local Post Office and requesting a mailing tub for each route, which you will return full of your ready-to-send EDDM mailpieces.
7. Drop them off!
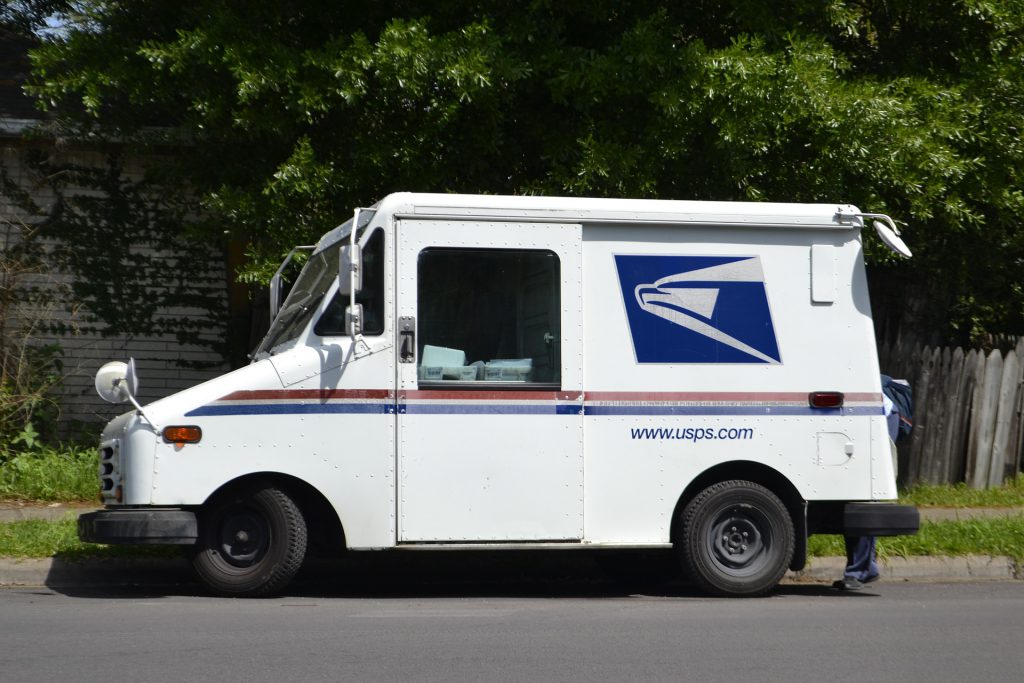
Success - Get those postcards out for delivery!
Image by F. Muhammad from Pixabay
Now that your mailpieces are sorted and grouped by postal route, you re ready to get them in the mail. Refer back to your Mailing Statement to verify which Post Office(s) you ll be visiting to complete the drop-off. Simply bring your mailing tubs into the appropriate Post Office along with your printed paperwork and hand it over to a Postal Service employee.If you chose the Pay at Post Office option, you ll also need to pay for your postage at this time. Thank the postal workers for their help and rejoice that you ve completed your first EDDM mailing project!
*********************************************************************************
In the end, there are three things that will have the biggest impact on the success of your do-it-yourself Every Door Direct Mail campaign:
- A great design,
- Well-chosen routes, and
- A little elbow grease!
MyCreativeShop s creative and on-point EDDM postcard templates are ready and waiting to make a splash in your campaign, and our printing (and bundling!) services are second to none, so jump in with both feet today!
*********************************************************************************
Essential resources for the EDDM DIYer:
